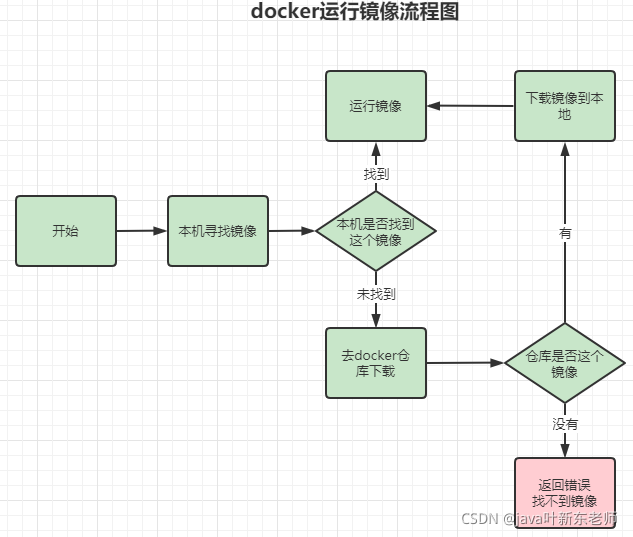
docker运行流程
首先系统要有一个docker daemon的后台进程在运行,当我们启动容器时会进行以下流程
- docker client(即:docker终端命令行)会调用docker daemon请求启动一个容器,
- docker daemon会向host os(即:linux)请求创建容器
- linux会创建一个空的容器(申请资源)
- docker daemon请检查本机是否存在docker镜像文件,如果有,则加载到容器中,如果发现镜像文件不存在本地,则会到默认的docker镜像仓库(即:docker hub网站)去联网下载,下载回来后,再进行装载到容器的动作;如果在镜像仓库也找不到这个镜像,就会返回错误,告诉客户端找不到这个镜像
- 将镜像文件加载到容器中(即:裸机上安装好了操作系统,不再是裸机状态)
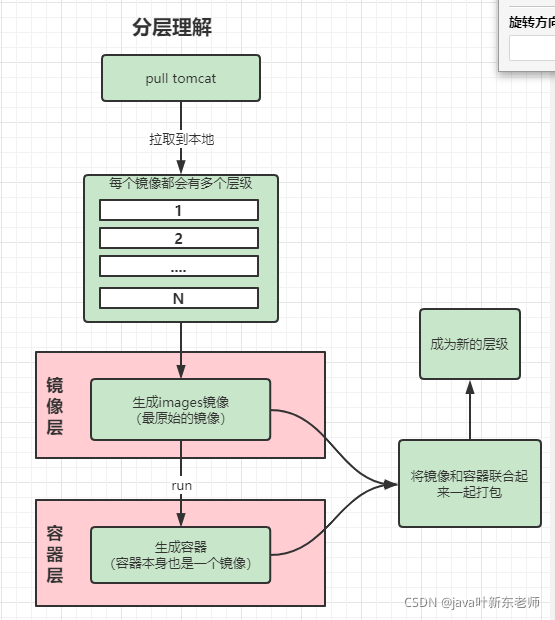
分层
当我们使用pull命令进行拉取组件的时候,比如我拉取tomcat,通常都是拉取好几个文件,分别下载下来,那么这些文件都是什么玩意呢? 熟悉tomcat的人都知道,tomcat是用java开发的,它是依赖jvm的,所以这些下载的文件里面就包含了tomcat的主文件、配置项、运行环境等等;
其实每下载的一个文件就是一个镜像,在运行的时候会将这些镜像组合起来成为一个新的镜像;这就是原始镜像,镜像运行起来之后称为容器,这个容器实际上也是一个镜像;它们之间的区别就是修改前和修改后的关系;这就叫分层
安装nginx
1、搜索nginx
head -5 表示只展示前5行
[root@VM_0_5_centos ~]# docker search nginx | head -5NAME DESCRIPTION STARS OFFICIAL AUTOMATEDnginx Official build of Nginx. 15707 [OK]jwilder/nginx-proxy Automated Nginx reverse proxy for docker con… 2086 [OK]richarvey/nginx-php-fpm Container running Nginx + PHP-FPM capable of… 818 [OK]jc21/nginx-proxy-manager Docker container for managing Nginx proxy ho… 260
2、下载nginx
docker pull nginx
3、启动nginx
- -d: 后台运行
- —name :容器名称
- -p打通宿主机和容器,访问宿主机的7777端口时实际上访问是容器的80端口;
docker run -d --name nginx_server -p 7777:80 nginx
到这一步,容器就已经运行起来了;接下来在浏览器访问 http://45.40.205.xx:7777 就可以直接访问到nginx的欢迎页面了
4、配置nginx
进入已经启动的nginx容器
docker exec -it 容器id /bin/bash
进入容器后,通过find命令找到nginx.conf文件
root@1d8a9fb4c5d9:/# find / -name nginx.conf/etc/nginx/nginx.conf
找到了,路径为:/etc/nginx/nginx.conf;我们先看看里面有啥:
root@1d8a9fb4c5d9:/# cat /etc/nginx/nginx.confuser nginx;worker_processes auto;error_log /var/log/nginx/error.log notice;pid /var/run/nginx.pid;events {worker_connections 1024;}http {include /etc/nginx/mime.types;default_type application/octet-stream;log_format main '$remote_addr - $remote_user [$time_local] "$request" ''$status $body_bytes_sent "$http_referer" ''"$http_user_agent" "$http_x_forwarded_for"';access_log /var/log/nginx/access.log main;sendfile on;#tcp_nopush on;keepalive_timeout 65;#gzip on;include /etc/nginx/conf.d/*.conf;}
最后最后面的 include /etc/nginx/conf.d/*.conf,这边导入了其他的配置文件,我们进入到 /etc/nginx/conf.d目录看看
root@1d8a9fb4c5d9:/# cd /etc/nginx/conf.droot@1d8a9fb4c5d9:/etc/nginx/conf.d# ls -ltotal 4-rw-r--r-- 1 root root 1093 Oct 26 11:14 default.conf
看到了吗? 里面还有个default.conf;这个文件里面内容才是真正的配置
root@1d8a9fb4c5d9:/etc/nginx/conf.d# cat default.confserver {listen 80;listen [::]:80;server_name localhost;#access_log /var/log/nginx/host.access.log main;location / {root /usr/share/nginx/html;index index.html index.htm;}#error_page 404 /404.html;# redirect server error pages to the static page /50x.html#error_page 500 502 503 504 /50x.html;location = /50x.html {root /usr/share/nginx/html;}# proxy the PHP scripts to Apache listening on 127.0.0.1:80##location ~ \.php$ {# proxy_pass http://127.0.0.1;#}# pass the PHP scripts to FastCGI server listening on 127.0.0.1:9000##location ~ \.php$ {# root html;# fastcgi_pass 127.0.0.1:9000;# fastcgi_index index.php;# fastcgi_param SCRIPT_FILENAME /scripts$fastcgi_script_name;# include fastcgi_params;#}# deny access to .htaccess files, if Apache's document root# concurs with nginx's one##location ~ /\.ht {# deny all;#}}
安装tomcat
安装命令和nginx大概一致,不同的是,官方推荐使用参数--rm,可在停止容器的时候顺便将容器删掉,如果不想删除,去掉--rm参数即可
# tomcat默认端口就是8080,所以这边映射到8080端口上docker run -d --rm -p 8080:8080 tomcat:9.0
启动后,在外部访问 123.xx.xx:8080 后会发现提示了404错误,表示这个页面找不到,虽然tomcat启动了,但是未找到页面;
原来是因为docker里面的tomcat是阉割版本,虽然是阉割,但是tomcat的页面还是在的,只是在另外一个地方;我们先进去容器里面找找看,
docker exec -it 容器id/容器名称 /bin/bash
进入之后,以下的命令都是在容器内运行的,查看后我们可以发现,除了有了webapps之外,还有一个叫做webapps.dist的目录;
root@c75c62eff5f6:/usr/local/tomcat# ls -ltotal 160-rw-r--r-- 1 root root 18994 Sep 28 13:34 BUILDING.txt-rw-r--r-- 1 root root 6210 Sep 28 13:34 CONTRIBUTING.md-rw-r--r-- 1 root root 60269 Sep 28 13:34 LICENSE-rw-r--r-- 1 root root 2333 Sep 28 13:34 NOTICE-rw-r--r-- 1 root root 3372 Sep 28 13:34 README.md-rw-r--r-- 1 root root 6905 Sep 28 13:34 RELEASE-NOTES-rw-r--r-- 1 root root 16517 Sep 28 13:34 RUNNING.txtdrwxr-xr-x 2 root root 4096 Oct 22 00:23 bindrwxr-xr-x 1 root root 4096 Oct 27 03:35 confdrwxr-xr-x 2 root root 4096 Oct 22 00:22 libdrwxrwxrwx 1 root root 4096 Oct 27 03:35 logsdrwxr-xr-x 2 root root 4096 Oct 22 00:23 native-jni-libdrwxrwxrwx 2 root root 4096 Oct 22 00:22 tempdrwxr-xr-x 2 root root 4096 Oct 22 00:22 webappsdrwxr-xr-x 7 root root 4096 Sep 28 13:34 webapps.distdrwxrwxrwx 2 root root 4096 Sep 28 13:34 work
进去webapps.dist目录可以看到,里面不就是原来webapps目录下才有的东西嘛
root@c75c62eff5f6:/usr/local/tomcat# cd webapps.dist/root@c75c62eff5f6:/usr/local/tomcat/webapps.dist# ls -ltotal 20drwxr-xr-x 3 root root 4096 Oct 22 00:22 ROOTdrwxr-xr-x 15 root root 4096 Oct 22 00:22 docsdrwxr-xr-x 7 root root 4096 Oct 22 00:22 examplesdrwxr-xr-x 6 root root 4096 Oct 22 00:22 host-managerdrwxr-xr-x 6 root root 4096 Oct 22 00:22 manager
既然有了, 我们只需要将这些东西复制过去就可以了
cp -rf ./* ../webapps
然后在外部访问 123.xx.xx:8080,就可以访问到tomcat的欢迎页面了
springBoot项目打包到docker运行
1、构建springboot项目
我们写一个最简单的hello world 控制层,代码如下
package com.spring.controller;import org.springframework.web.bind.annotation.RequestMapping;import org.springframework.web.bind.annotation.RestController;@RestControllerpublic class HelloController {@RequestMapping("/hello")public String hello(){return "hello world yexindong";}}
代码写好之后,将springboot项目打成jar包;运行命令
mvn clean package
2、编写DockerFile脚本
运行java程序需要有java虚拟机的支持,并且要把打包后的jar包加入到容器中,新建一个文件,名称为:“DockerFile”,文件内容如下;
FROM java:8COPY *.jar /app.jarCMD ["--server.port=8080"]ENTRYPOINT ["java","-jar","app.jar"]
3、构建容器
将刚刚打包的jar包和写好的DockerFile文件复制到linux系统中,然后执行dockerFile文件进行构建容器,这两个文件一定要放到同一个目录下,不然构建会出错,一切准备就绪后,开始运行构建命令
docker build -f DockerFile -t spring_boot_4 .
查看镜像,发现已经存在了
[root@VM_0_5_centos springBoot_1]# docker imagesREPOSITORY TAG IMAGE ID CREATED SIZEspring_boot_4 latest d842e6813ee9 2 minutes ago 663MB
4、运行容器
打包好之后就可以直接运行了
docker run -it -d -p 8080:8080 --name spring_boot spring_boot_4
5、发送请求
在命令行请求这个接口,返回了接口数据
[root@VM_0_5_centos springBoot_1]# curl localhost:8080/hellohello world yexindong


